Imagine stepping outside in the morning to a beautiful deck, coffee in hand and the Melbourne sun warming your face. That dream decking area doesn’t happen by accident – it starts with smart planning.
In this step-by-step guide, I’ll show you how to plan every detail of your perfect decking area: from choosing the best spot in your yard to picking materials, budgeting, safety rails and more. By the end, you’ll have the confidence and checklist you need to start building your dream decking area today!
Step 1: Dream Up Your Deck’s Purpose
First off, imagine how you’ll use this new space. Will it be an outdoor dining area with a barbie and picnic table, or a cosy lounge for evening drinks and chinwags? Maybe you want a sunny yoga spot or a play area where the kids can safely ride bikes. Grab a pen and sketch some ideas — even a rough doodle helps.
The more clearly you define the purpose (and size) of your deck, the easier it is to plan every other detail. If entertaining is on your agenda, for example, you might plan for built-in bench seating or a large dining table. On the other hand, if you picture quiet mornings alone, a compact, intimate deck near the garden might be perfect.
Step 2: Scout the Perfect Spot for Your Deck
Head into the backyard and size up your space for decking. Notice how the sun tracks over your yard – a north-facing deck is great for winter warmth, maybe with a pergola for summer shade.
Look at the lay of the land: are there big trees (awesome for shade, but watch their roots), fences or walls (privacy?), or a slope (which might call for stepped levels or a retaining wall)? Check how close your deck will sit to the house: an attached deck needs a strong ledger and firm footings, while a free-standing deck sits on sturdy posts and can be more flexible in layout.
Think through practical details: will you need stairs or a gentle ramp, and can any water taps, power outlets or gas lines be accessed easily? Jot these down as they could affect your design. If the planning and surveying part feels overwhelming, you could chat with Expert Decking Services in Melbourne for expert advice on getting the most out of your spot.
Step 3: Set Your Budget and Timeline
Now let’s talk numbers. How much can you spend on decking? Prices vary a lot depending on materials and size: a basic pine deck might come in around $200–$400 per square metre, while a luxe hardwood or composite deck could be $500+ per square metre.
Decide on a rough budget early (and tack on a 10–20% buffer for surprises). Also think about timing: if you want the deck done by summer, you’ll need to lock in a builder or DIY plan well before then. Making these decisions up front keeps your project on track.
Don’t forget to factor in council permit timelines, which can take weeks. For a more accurate estimate, get quotes from a few deck builders or suppliers. Compare options and check references so your budgeting is solid and realistic.
Step 4: Pick Decking Materials and Style

Merbau timber decking – a rich, reddish hardwood – is a popular choice that adds warmth and natural beauty to any deck. You can also go modern: composite decking boards mimic wood grain but resist rot and need almost no maintenance. Composite boards are ideal if you want a low-maintenance decking solution. Let’s compare the big options:
- Merbau & Other Hardwoods – Timeless appeal with warm colours and durability. Merbau, spotted gum and other hardwoods can last decades. They resist scratches and heavy use, but expect to regularly stain or seal them to preserve the colour.
- Treated Pine – A classic Aussie choice for a lower cost. It looks great when freshly stained, but will grey out over time. Plan to oil or seal pine annually, and watch out for splinters.
- Composite Decking – Made from a recycled wood/plastic mix, composite decking boards look like timber without the warping or rotting. They’re super low-maintenance (no sanding or staining) and come in a range of colours. On the downside, they get warmer in direct sun and are pricier upfront. Composite is often bushfire-rated (great for Melbourne’s climate) and comes with long warranties (15–25 years).
Your choice affects not just the look but how much upkeep you’ll need. Think about colour too: rich earthy tones (walnut, mocha, honey oak) are trending to complement Aussie landscapes, while lighter greys can make a small deck feel more spacious.
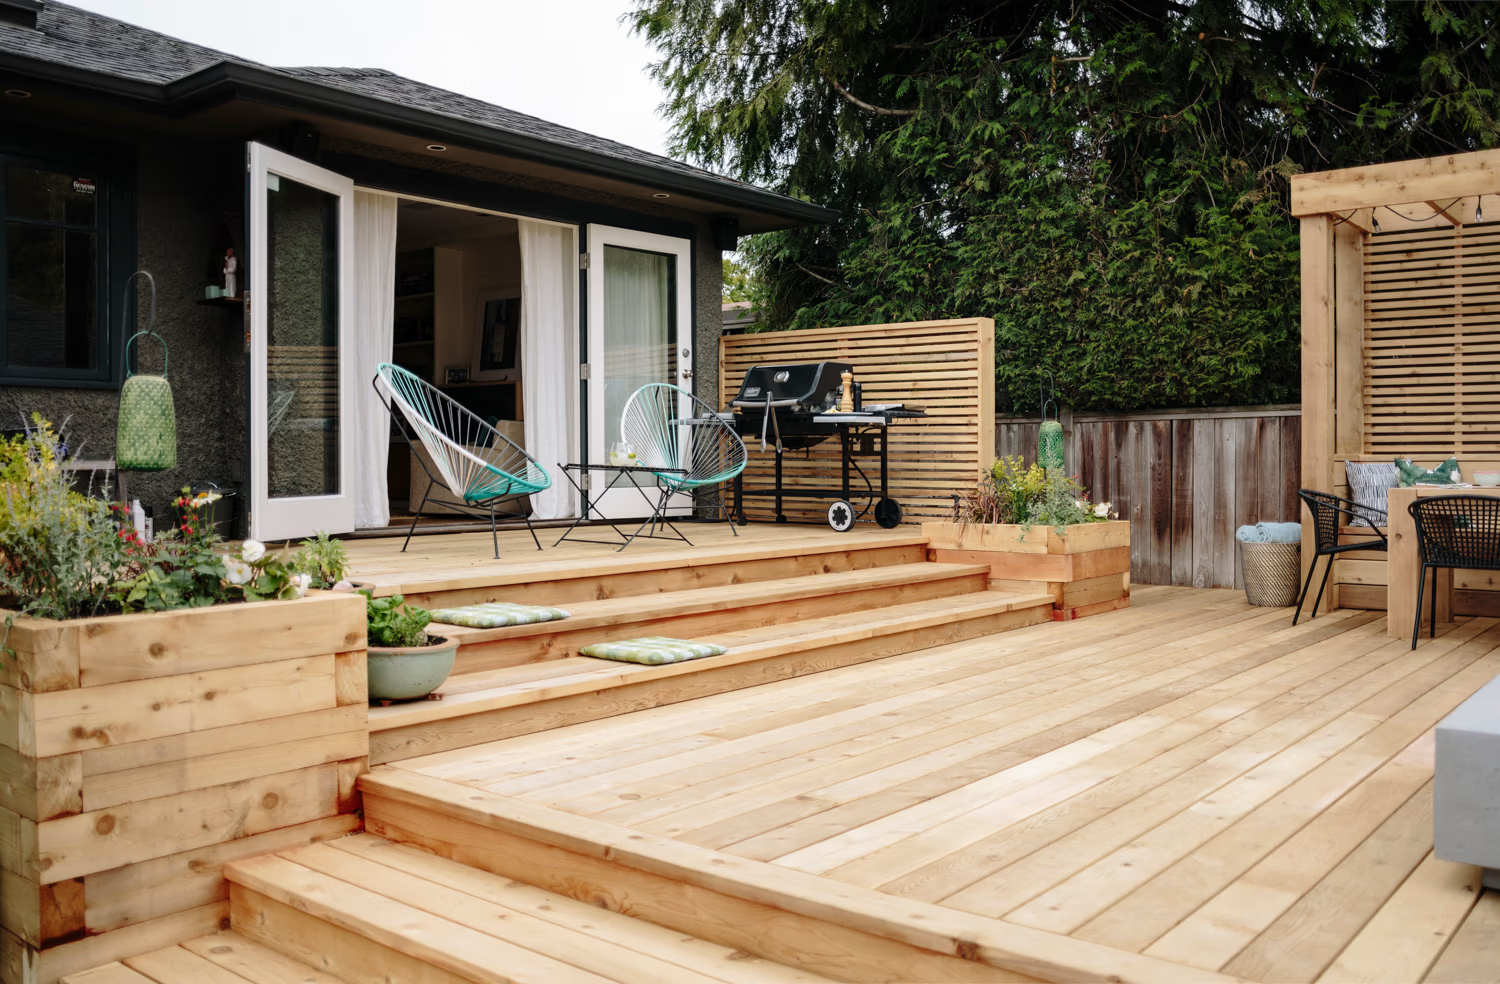
Step 5: Map Out the Layout and Features

Now comes the creative part: sketching out your deck layout. Will it be a simple square or an L-shape wrapping around the house? Many folks love multi-level or “zoned” decks – for example, one area for dining, another for lounging or even a fire pit. Plan the shape and size relative to your house and yard. Think about adding features that fit your lifestyle:
- Stairs or Ramp: How will you move between levels or down to the yard? Ensure stairs are wide enough (at least 850mm) and have a handrail if needed. A gentle ramp can make the deck accessible to everyone (great if elderly family or prams use it).
- Seating and Storage: Built-in benches save space and add style. You could even build a storage box under a bench or under the stairs for cushions and tools.
- Pergola or Shade: If the deck will bake in sun, consider a roof or pergola. Shade sails or a large umbrella are cheaper options, while a pergola or awning gives permanent shelter (perfect for those scorching Melbourne afternoons).
- Lights and Outlets: Plan for outdoor lighting early on. LED deck lights, post lights or festoon string lights can extend your evening parties well past sunset. Also think about where you’ll need power points for BBQs, heaters or speakers.
- Decor and Privacy: You might add planters, bamboo or lattice screens along fences, or privacy screens to create a cosy feel. These touches make the deck feel like a proper outdoor room, not just a bare platform.
Each feature you plan will guide the build. Take measurements, consult with family on needs, and get imaginative – with a bit of planning your deck can have all the bells and whistles you want.
Step 6: Safety First – Rails, Codes, and Accessibility
Safety is huge, so let’s get the details right. In Australia, any deck more than about 1 metre above ground must have a sturdy balustrade (guardrail) about 1 metre high. Stairs need a handrail roughly 865mm above each step. Gaps in the railing should be no wider than 12cm to stop kids squeezing through.
Make sure everything is strong: building codes assume people might lean or bump into rails, so use solid posts and fixings. Finally, think about access: a gentle ramp and secure handrail can keep everyone – from toddlers to nan safe and comfy. If the idea of measuring or fitting rails feels tricky, Expert handrail installation Melbourne can ensure everything is built to code and looks great.
Step 7: Building Day – DIY or Hiring a Pro?
Now it’s construction time. You could roll up your sleeves and DIY, but remember: decks are serious structural projects. Builders know local codes and have the gear (post-hole diggers, levels, power tools) to do it right. A professional deck builder can also handle permits, inspections and complex details like connecting to your home.
A good crew can usually finish a standard deck in days that might take you weeks, so weigh the time saved against cost. Compare a few quotes and check references so you’re confident who’s building it. If you go DIY, double-check every measurement, use quality materials, and allow plenty of time – that way your deck will come together smoothly. Either way, once the build starts, you’ll see your plan come to life in no time!
Step 8: Permits, Regulations and Final Checklist
One last step – dotting the i’s on legality. In Victoria, any substantial decking area almost always needs a building permit. For example, Moorabool Shire Council explicitly says all decks need a permit (even small freestanding ones). So before you build, check with your local council or a registered building surveyor.
Double-check any planning rules (like overshadowing neighbours or heritage zones) that might apply in your suburb. A quick call or visit to council can save a heap of headaches later. With permits sorted, you’re finally ready to build! Always keep a copy of any approvals or certified plans handy for inspection.
Conclusion
Planning a deck is a big project, but now you have the roadmap. You’ve scoped your space, set a budget, chosen materials, and covered all the safety and legal checkboxes. The hard work upfront means your new deck will be both safe and stunning. So, what are you waiting for? Sketch your final plan, order those materials or give a builder a call, and start building your dream decking area today!
Frequently Asked Questions
Q: Do I need a building permit for a decking area in Melbourne?
A: In most cases, yes—especially if the deck is over 1m high or large in size. Smaller, low-level decks may be exempt. It’s always best to confirm with your local council.
Q: What decking materials work best in Melbourne’s climate?
A: Hardwood and composite decking are top choices due to durability in sun and rain. Hardwood needs regular staining, while composite offers low maintenance. Treated pine is budget-friendly but needs more upkeep.
Q: How much does decking cost per square metre?
A: Costs range from $200–$350/m² for treated pine to $400–$800+/m² for hardwood or composite. Pricing depends on design, materials, and labour. Extra costs may include permits and handrails.
Q: How long does it take to build a deck?
A: Small decks can take a few days to a week to complete. Larger or complex designs may take several weeks. Approval processes can also add extra time.
Q: How do I keep my deck looking great?
A: Timber decks need regular cleaning and sealing every 1–2 years. Composite decks require only occasional washing. Good drainage and trimming nearby plants also help prevent damage.
Q: Can I add a ramp for wheelchair access?
A: Yes, decks can include wheelchair-friendly ramps with proper slope and safety features. Planning this early ensures compliance and better design. Non-slip materials and sturdy handrails are important.
Q: Why is composite decking more expensive upfront?
A: Composite decking costs more initially due to materials and manufacturing. However, it requires minimal maintenance over time. This makes it cost-effective in the long run.
Q: How often should I seal or stain my wooden decking?
A: Typically every 1–2 years, depending on weather exposure and wear. Regular maintenance protects against UV damage and moisture. Annual inspections help identify when it’s needed.